Showing posts with label Easter crafts for kids. Show all posts

Friday, March 22, 2013

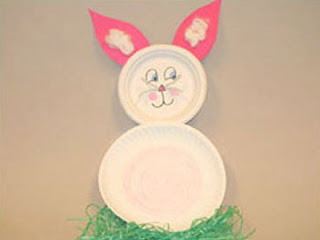
Easter Crafts: Paper Plate Easter Bunny

Easter crafts

Paper plate kids crafts are very easy and extremely affordable. How to be Super Mom suggests you keep all the left over paper plates from events and holidays until you get the chance to make one of our paper plate crafts.
The Easter bunny is one of the most important symbols of Easter Sunday, maybe not as popular as Santa Claus on Christmas but  kids wait for him to bring them chocolate eggs and candies.
This Easter bunny craft will look nice if hung on the fridge or the bedroom's door.
A cute character that your children will love making with you, all you need is paper plates, glue and a marker. Ready? then get your supplies ready and lets get crafting.

Supplies Needed
  • 2 white paper plates, one slightly bigger than the other
  • 1 pink card board
  • A small quantity of cotton
  • Black, pink and blue marker
  • Glue
  • Scissors

Directions
  • Glue the large plate over the small one like seen in the picture.
  • Draw two large bunny ears on the pink card board, cut them out and glue them from the back side of the small paper plate.
  • Glue the cotton in the middle of the bunny ears.
  • Using the markers, drew the eyes, nose and mustaches.

See how easy that was? I know that you all love to craft with your kids but you do search for quick and easy crafts since every super mom is over loaded with house chores, errands, and she still loves to spend quality time with her children. How to be Super Mom has always insisted on the importance of a mother-child time and we will always provide you with the best kids crafts to allow you to get more creative ideas along the way.

Easter is coming soon, so why not concentrate on making your own holiday decoration. Bunnies, chicks and eggs can fill your house for a remarkable low cost. Enjoy super moms and keep following our Blog for more ideas on Easter crafts.


Monday, March 18, 2013

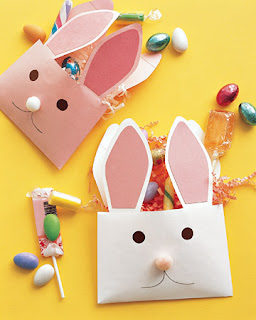
Easter Crafts - Easter Bunny Bags

Easter crafts
Make your own Easter bunny bags following simple steps-
Kids love candy, even though "How to be Super Mom" advice parents to discourage the daily intake of sugary foods but a holiday is sweeter with chocolates and lollipops. If you have the custom to set up an Eater tree then this kids craft is great to be hanged on the tree for decoration. In case you don't like trees, you can prepare these bags to offer them to children visiting your house on Easter Sunday.
Your children will be happy to prepare this Easter craft, and they will be thrilled to offer them to their friends and cousins. Take fifteen minutes out of your busy day and teach your child how to craft this easy bunny face, prepare them from now to be ready when the holiday comes.

Supplied Needed
  • 2xA4 white card boards
  • 1xA4 pink card board
  • 1x A4 black paper sheet
  • 1 white cotton ball
  • Glue
  • Scissors
  • Black marker
  • Ribbon
  • Stapler

Directions
  • Take 3 cm from each side (width wise).
  • Draw a 3x 29.7 cm rectangle from each side, and fold the papers following the line you draw.
  • After folding the edges, fold your paper in half.
  • Glue the edges together to make the bag base.
  • Draw four bunny ears on the white sheet if you decided to make a white kids craft.
  • Cut them out.
  • Draw two smaller bunny earlobes on the pink card board if your ears were white and vice versa.
  • Glue the ear lobes on the front side bunny ears.
  • Glue the ears in place as shown in the picture.
  • Cut out two black circles from the black paper for the eyes or use googly eyes.
  • Glue the cotton ball for the nose, and draw the mouth with a black marker.
  • To hang your bag on a tree, staple a ribbon on both sides of the bunny bag.

Easter crafts are fun if the whole family contributes in the making. Consider inviting your husband to join in, your children will be thrilled and he will learn that spending additional time with his loved ones is a blessing.
How to be Super Mom is posting daily kids crafts that are easy and convenient for all ages, don't forget to join our site, register as a follower and become one of our fans on Facebook.


Monday, March 04, 2013

Easter Crafts: Paper Chicks Egg Holder

Easter crafts for kids

If you're looking for preschool craft ideas then you will love this one. It is very easy indeed, and children from 4 and up will be able to make it by themselves. The bird at the left was crafted by my 4 year old girl, I didn't help! She just followed the steps I took while making the first bird. I am telling you this to prove to you two important things, the first is that this kids craft is very easy and the second point is showing you that crafting with your kids from an early age, as early as 1 year old will allow them to grow up knowing exactly how to use their hands and manipulate scissors, crayons and what ever might be needed to finish a craft.

Dear super moms, spending quality time with your children crafting will help them learn many things other than the simple obvious matter of how to make the project in hands. Please, take 15 minutes out of your busy day and craft with your child. How to be Super Mom is posting free craft ideas for children which won't need more than few simple and low cost supplies. Craft with them and share their work with us!

Supplies Needed

  • 2 googly eyes
  • Orange A4 paper
  • Yellow A4 paper
  • Transparent glue
  • Scissors
  • Pencil

Directions

  • Cut one 5x15 cm rectangle, and one 5x12 cm rectangle.
  • Form a cylinder with each and glue the borders.
  • Glue the small cylinder on top of the larger one- the bottom cylinder will allow us to insert a decorated Easter egg.
  • On the orange paper, draw 2 large paws, 2 wings, and a diamond shape for the beak.
  • Glue the wings on the inner side of the bottom cylinder.
  • Glue the paws on the bottom of the large cylinder.
  • Fold the diamond in half and glue one half on the middle of the top cylinder allowing the other top to point out as an opened beak.
  • Glue both googly eyes and your chick is ready for your Easter decoration.
This could be a great way to decorate Easter eggs if you are not planning on coloring them. The chicks will make a beautiful Easter table ornament.


Monday, February 18, 2013

Easter Crafts: Easter Bunny Mask


Easter is near, and Easter crafts are fun. Kids would love to prepare the house decoration and you will gain the opportunity to spend an extra quality time with them. Wouldn’t you love that? I adore my daughters, but there is a 4 year difference between them both, so I have to create 2 crafts at a time; one that will suit a one year old and another that will be fun and interesting for a 5 year old. Today we made this fuzzy Easter bunny mask. My 5 year old enjoyed it a lot, and she was able to make more than 90 percent of the work by herself. Just the cutting part wasn’t very easy since the mask template was a little hard, but she punched out the eyes of the Easter bunny mask and she glued the inner pink ears, the cotton, and created the muzzle.
'How to be Super Mom' makes sure to provide you with the most creative and easy crafts. 
Follow the instructions super mom and your Easter bunny craft will be done in no time.

Easter Bunny crafts

Supplies Needed


  • White card-board
  • Pink crepe paper
  • Transparent Glue
  • Cotton
  • Thin wire
  • Stapler
  • Ribbon
  • Manual Puncher
  • 2 wooden sticks


Directions


  • Draw the Easter bunny mask template on the white card board. Using 2 circles the size of your child's face make the shape of an eight and decorate it with two long ears. The muzzle is an essential part for the mask to look real, so don't forget to add that too.
  • Cut the template out.
  • Using the pink paper crepe, cut two ear lobes and glue them in the center of each ear.
  • Glue cotton all-over the Easter bunny mask and muzzle.
  • Make a small pink ball for the nose.
  • Cut 8 wire strings, 8 cm each, gluing 4 to each side of the muzzle.
  • Glue a wooden stick on the back of each ear, allowing it to stand up straight. This will give it a more professional look.
  • Staple the ribbons to tie the mask around your child's face. 
A very easy and fun Easter Craft created by How to be Super Mom.