Showing posts with label Crafts. Show all posts

Monday, March 11, 2013

St Patrick Day Crafts for Preschoolers: Head Band

st patrick day crafts for preschoolers
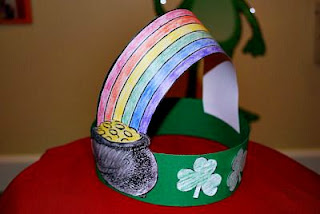
When St Patrick's Day comes you would want to have prepared something nice and original for your kids to wear on their heads. While surfing the web, I chose this cute design and decided to give you few pointers to simplify the making of this head band.
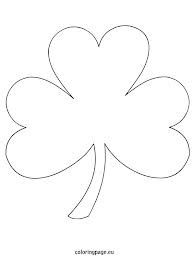
The shamrock, the rainbow, the pot of gold and the green color are the main elements that should be present in mostly all the St Patrick day crafts for preschoolers.
How to be Super Mom includes two printable coloring pages to help you finish the head band faster.

Supplied Needed
  • Green card board
  • 2 white A4 sheets
  • Coloring pencils
  • Scissors
  • Glue

Directions
  • Print out the golden pot on one sheet, and many small shamrocks on the other.
  • Color them, and cut them out.
  • Draw a 5x55cm rectangle on the green card board.
  • Cut it out
  • Glue the ends together
  • Glue the shamrocks and the gold pot as seen on the picture.

Kids crafts offered by How to be Super Mom are easy, and don't require a lot of effort. Our main goal in choosing such simple crafts is to allow you to spend quality time crafting with your child no matter how busy your day was.
A craft like such doesn't require more than 15 minutes to be done. Your child will enjoy the time spent with you and he will get to learn a lot. Use our free crafts as a guide to help you freshen up your ideas for new kids crafts.
For questions, comments or suggestions please don't hesitate to leave your message or contact me by email. It is always a pleasure to hear from you.
st patrick day crafts for preschoolers


st patrick day crafts for preschoolers

Sunday, March 10, 2013

St Patrick Day Crafts for Preschoolers: Rainbow Gold Pot

st patrick day crafts for preschoolers
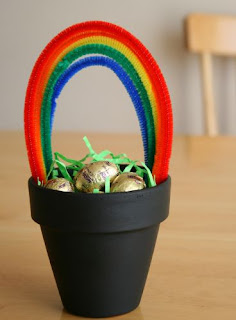
St Patrick day crafts for preschoolers are fun, colorful and very joyful to make. How to be Super Mom has prepared a bunch of crafts to help you enjoy this Holy holiday with your children.
The rainbow, the treasure and leprechauns go back to an old Irish legend, and since this holiday is about celebrating the arrival of the Christianity to Ireland, the Irish culture dominates all the aspects of this day.

This craft is very easy, all you need is an old flower pot, colored pipe cleaners, and you got yourself a beautiful ornament unit.


Supplies Needed
  • 1x flower pot
  • 5 different colored pipe cleaners
  • 10 small pebbles
  • Black paint
  • Gold paint
  • Green crepe paper

Directions
  • Start by painting your flower pot in black.
  • Paint the pebbles in gold and keep them all to dry for an hour or two.
  • Afterwards, shred the green crepe paper into little stripes and fill the pot with both the papers and the rocks.
  • Glue the five different pipes to form a rainbow.

A very easy and simple St Patrick day crafts for preschoolers offered to encourage you to spend more time with your child creating beautiful stuff.
Children are a blessing, the more you spend time with them the more you get to teach them new stuff. How to be Super Mom will always offer you free ideas to help you through the motherhood trip.

Saturday, March 09, 2013

St Patrick Day Crafts for Preschoolers: Rainbow Mobile

st Patrick day crafts for preschoolers

How to be Super Mom will provide you with the best crafts for St Patrick's day. As a mother, I am always looking for easy St Patrick day crafts for preschoolers and this one was amazing, my daughter loved crafting it. We made 10 and we will hang them around the house the night we will be throwing the party. I love celebrating holidays, and even though St Patrick's day is not a popular holiday in my country but I always like to start my own family traditions.


Supplied Needed

  • 1x white card board
  • 1x red crepe paper
  • 1x orange crepe paper
  • 1x yellow crepe paper
  • 1x green crepe paper
  • 1x blue crepe paper
  • 1x pink crepe paper
  • 1x purple crepe paper
  • Rainbow template
  • Glue
  • Scissors
  • Ribbon

Directions

rainbow template

  • Use this template to draw a rainbow on the white card board.
  • Cut 1x30 cm long crepe strips.
  • Glue them to the white rainbow, leaving 10 cm loose from each side.
  • Tie a ribbon and hang them in your living room.


How to be Super Mom offers our lovely super moms easy St Patrick day crafts for preschoolers to enjoy. Crafting with your children is very important, and you should try to take 15 minutes out of your daily hectic routine to create something new with your child. This will help blossom his imagination, and allow him to get a better grasp of all the necessary gestures such as holding a pencil, gluing or cutting.
Spending quality time with them is a must if you are willing to have intelligent children with great potentials.
Please do not hesitate to contact me, I am always ready to answer all your questions and you can also join us on Facebook.


Thursday, December 06, 2012

Christmas Crafts: Paper Plate Snowman


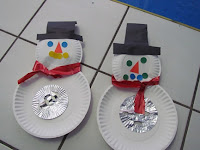
You can make this cute snowman from two or three paper plates and decorate it with construction paper.

Supplies

  • Paper Plates
  • Construction Paper
  • Hole puncher
  • Markers
  • Scissors
  • Googly eyes (optional)
  • 3 buttons ( optional)
  • Glue
  • Ribbons

Directions

  • On one of the plates, cut a smaller circle for the head.
  • Punch a hole near the rim of both plates.
  • Tie them up with ribbons or you can simply glue both plates together without punching.
  • Make the hat, scarf and buttons from construction papers or use real buttons, and a small knitted scarf for the snowman.
  • Glue the googly eyes together.

I bet your child will love crafting this snowman.

Monday, September 17, 2012

Googly Handmade Name Tag


 What is more fun than this name tag with googly eyes? Enjoy this month, by preparing handmade name tags with your child.

Supplied Needed

1 red canson paper
1 purple canson paper
1 white canson paper
2 googly eyes
1 red crayon
White pen
glue

Directions


Cut one 8*5 cm purple rectangle and one 4*4 cm red square.
Cut a 4*7 white rectangle and then cut it diagonally like the white piece in the picture.
Glue the white piece on the purple rectangle.
Than the red square just like shown in the first picture.
Write your kid's information on the red square piece.
Glue the googly eyes on the white piece and draw a smiley red mouth.

You May Also Like


Black Board Name Tag


Friday, September 14, 2012

Handmade Name Tag: Black Board

Handmade name tag

Get your kids to prepare their own name tags for school, this will make a great initiative for them. A truly easy project, and you can from this simple idea make many other name tags that are even more beautiful and more creative than the one I made for you.

Supplies Needed:


Black construction paper
Red construction paper
White pen
1 small coloring pencil
2 small crayons
glue
Laminating film

Directions


Cut a 6*8 cm rectangle from the black construction paper.
Cut a 6*8 cm red rectangle and empty the inside by cutting a 4*7 cm rectangle.
Glue the red rectangle over the black to make the frame.
Using the white pen, write on your black board.
Write your child's name and grade.
Wrap the name tag with laminating film.
Decorate it with the small coloring pencil and crayons.

You May Also Like


Father's Day Handmade Card
13 cute back to school hairstyles


Tuesday, July 24, 2012

Colored Rice: How-To

It is as easy as a piece of cake. All you need is rice, food coloring and a plastic bag

colored rice


colored rice

colored rice

Supplies Needed

  • Rice
  • Food Coloring: Blue- Yellow-Red
  • Plastic bags
  • Gloves (optional)

Directions

  1. Put a handful of rice in a plastic bag
  2. Add 2 drops of a food coloring of your choice
  3. Shake well
  4. Place rice on a paper towel and allow to dry

Tip

You can mix food coloring to create more colors
Yellow+ Red =Orange

Yellow+ Blue= Green

Red +    Blue= Purple

Notification

How To Be Super Mom will be posting new crafts everyday, if you liked our page please add us to your mailing list and visit our Facebook page and Like us.
How To Be Super Mom

Promote Your Page Too

Tuesday, June 12, 2012

Father's Day Card and Picture Holder

Handmade Father's Day Card

This will make a perfect gift for a traveling father,
 it's a card and a photo holder in the same time.

Supplies Needed


  • 4 Construction Papers (any color)
  • White Marker
  • Glue
  • Scissors
  • Zigzag scissors
  • Your kids Picture 
 

Directions


COnstruction paper


Choose one of the construction papers and cut out a 14*24 cm rectangle


Construction Paper


Choose another color, and cut out, using the zigzag scissors, a 12.5*22.5 cm rectangle
Glue it in the middle of the first rectangle


Father's Day card

From the same basic construction paper cut 9*18  cm parallelogram, and glue it as seen in the picture.

From a third construction paper, cut a 11*11 cm square, and glue it as posted.


Handmade Father's Day card

Cut out from the 4th construction paper the shape of a tie, you can use the pattern we posted earlier( click)

Glue it as posted


HANDMADE PICTURE HOLDER

Cut from the basic construction paper, a 11* 23cm rectangle and glue it to the back. To hold it better you can use a glue gun.

Put glue only on the borders to be able to enter the pictures.


Father's day handmade card and picture holder

Write a small quote using the white marker

Place the pictures you chose in the back pocket you made


Join us on Facebook


Sunday, June 10, 2012

How to make a Father's Day Handmade Card


Follow the Super Mom steps to make this cool handmade card


Supplies Needed

2 A4 Construction paper ( any color)
Glue
White pen 
Colored pen
2 buttons ( any color)
Scissors or a punch


Directions


  • Fold the A4 paper in half
  • Cut from one of the halves a 4 cm width rectangle
  • On the other half, measure 4 cm from the top then cut 3.5 cm from each side


  • Fold the cuts to form a blouse collar


tie pattern


  • On the other construction paper, draw a tie. You can use this pattern if you desire.
  • Cut it off with using scissors or if your kid was younger than 4 he can use a punch


  • Glue the tie
  • Glue both sides of the collar


  • Decorate your tie with stripes, dots or you can even glue colored stripes or colored dots that you will cut out from another construction paper.


  • Striped Tie


step by step handmade card


  • Cut an eight * five rectangle from a construction paper of your choice, fold it from the top just like a blouse pocket.


  • Cut a small triangle to form the handkerchief
  • Glue the handkerchief, then the pocket
  • Using the white pen, draw the stitches. But be careful this is supposed to be a folded shirt so don't draw the stitches all around the shirt! 
  • Follow my steps please


  • Glue the bottons on the bottom of the collar
  • Write Happe Father's Day or any other sentence you like, you can even pick a quote from www.quotegarden.com


Join us on FACEBOOK and become a member of How To Be Super Mom

Related Topics

father's day pencil cup
Father's Day Pencil Cup

Tuesday, June 05, 2012

Let's Craft: Father's Day Pencil Cup

handmade pencil cup

 Daddy will be very proud to put this pencil cup on his desk!


Supplies Needed


  • A photoshop picture of your kids
  • A cylindrical carton box
  • Glue
  • Scissors
  • White paper
  • Laminating paper

Directions


 Put glue all over the cylindrical box


Stick the picture on the box


Cut the paper extra ends
Glue the inside and cover with a white paper for a better finish


Add this to the How to be Super Mom "gift to make" ideas

Thursday, May 31, 2012

Let's Craft: A Blooming Popcorn Spring Tree

 How To Be Super Mom Spring Blooming Tree


tree craft


* Easy Craft For all Ages

Supplies Needed

  • Small Tree Branch
  • 1 Cup of Popcorn
  • 1 Green Crepe Paper
  • Glue
  • A small flower pot

 Directions

  • Fill the pot with dirt and stick the tree branch
  • Wrinkle the green crepe paper into tiny balls ( they will represent the green leaves on a spring tree)
  • The popcorn will represent the small white flowers on a spring tree
  • Start gluing both of the popcorn and wrinkled paper to the branch

Related Posts:

Let's craft: Funny Smurfette Paper Puppet


Let's Craft: Funny Animal Head Straws


Tuesday, May 22, 2012

Let's craft: Funny Smurfette Paper Puppet


Supplies Needed:

  • 8 paper tissues
  • 1 blue paper
  • wooden stick
  • transparent scotch tape
  • yellow yarns
  • white construction paper
  • white crepe paper
  • glue
  • coloring pencils

Directions

  • Make a ball out of the paper tissues
  • Cover the tissues with the blue paper and wrap with scotch tape until you get a firm ball
  •  Stick the ball on a wooden stick
  • Make a cone (for the body) from the white construction paper and glue it under the head
  • Cover the construction paper with crepe
  • Using the yellow yarns, make the smurfette's hair
  • A small cone from the crepe paper will form the smurfette's hat
  • Draw on the construction paper 2 eyes and a mouth, colour them, and glue them in place.
  • Let your kid decorate the smurfette's dress
  • And now you have a funny little smurfette puppet!!!


 Add this craft to your "how to be super mom" manual

Related Topics

Let's Craft: A Blooming Popcorn Spring Tree

Let's craft: Funny Animal Head Straws